CONTENT
1.R/3 Overview 2
2.Starting & Stopping R/3 System 4
3.SAP User Administration 8
3.SAP User Administration 8
4.Spooling and Printing 30
5.Background Processing 40
6.R/3 System Landscape 52
7.Client Administration 64
8. R/3 Administrative Task 78
9. Backup & Restore 82
10. SAP Router Installation
R/3 Overview
Database Server
This is where R/3 and the database reside.
The system clock of the database server is the master clock for the R/3 system.
Application Server
This is where R/3 application runs on a two-tiered system; this would be combined on the database server. Application Servers can be dedicated to online users, batch processing or a mix.
Instance
An installation of R/3 on a server.
The two types of instances are central, and dialog. More than one instance could exist on a physical server.
System
The complete R/3 installation for a System ID (SID), for example PRD.
A system logically consists of the R/3 central instance and dialog instances for the SID. This physically consists of the database server and application servers for that SID

Startup / Shutdown R/3
Stop R/3 only after all checks have been made and you are certain that there is no activity on the system.
To Stop the R/3 System:
If there are application servers in the system, stop the instance on the application
server(s).
Stop the instance on the database server.
This script may also stop the database; check your specific installation.
If needed, stop the database.
If needed, stop the operating system.
Shutdown R/3 & Database in UNIX/AIX
Telnet or Putty to server
Login sidadm
Execute command: stopsap or stopsap r3
Stopsap : It will stop both Database and SAP
Stopsap r3 – will stop only R3 instance and Database remains in running mode.
Execute command: startsap
It will start both Database and SAP
Starting & Stopping SAP System
1. Log in to the system
2. Goto the command prompt
3. Telnet or through Xmanger to the application server IP address

4. Login with root
5. switch to the user <SIDADM> with command
6. su – tsqadm
7. Starting the sap using the command startsap r3

8. Stopping the sap using the command stopsap r3

9. To check the work process status the command
Ps –ef | grep dw


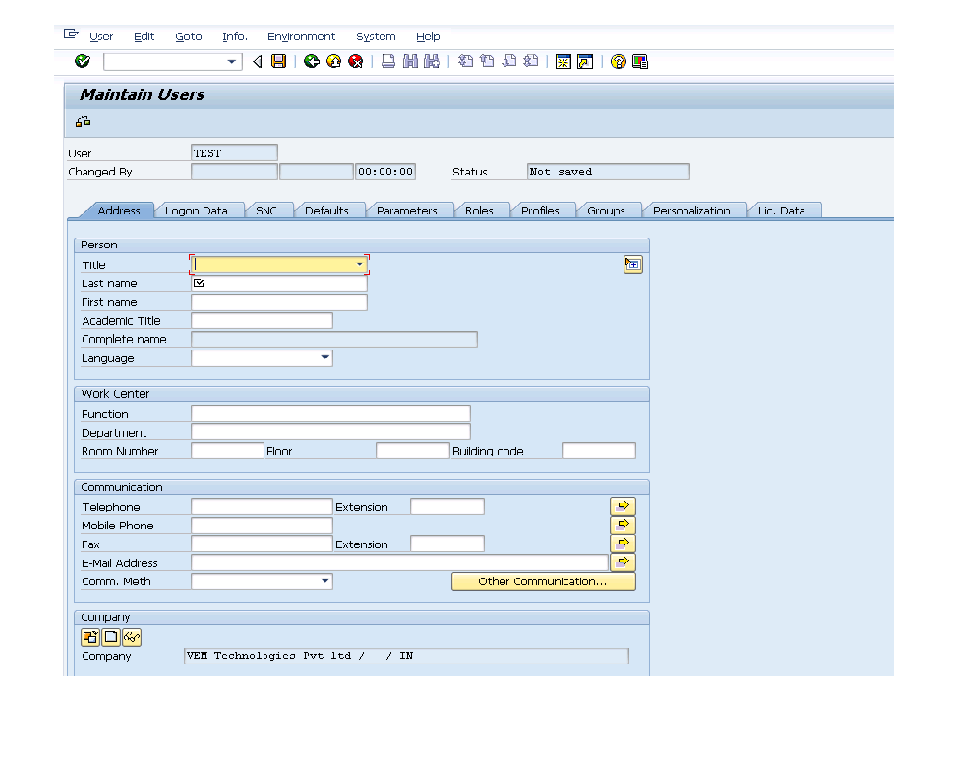
User Administration
The procedural prerequisite is to check that all documentation and authorizations required
To set up a new user are present.
There are two ways to create a new user:
Copy an existing user
Create a new user from scratch
In the Command field, enter transaction SU01 and execute. (Or from the SAP standard menu,

Enter the required details in the Address screen for the new user.
Enter the initial Password and other required data in the Logon Data Screen

Enter the Decimal Notation, Date format and Time Zone details in the Default Screen

Assign the required roles to the new user

Save the Newly created User.
Procedure to Reset the Password in SU01
Enter the User ID and click the Icon to change password
 Enter the New Password, click to save the password
Locking or Unlocking a User using SU01 Transaction code:
In User Maintenance initial screen enter the User ID to be locked and click the Icon to lock.

The below screen will be displayed showing the status of the user ID
 Click on icon to lock the User ID.
Un Lock the USER ID:
In User Maintenance initial screen enter the User ID to be unlocked and click the Icon to unlock.

Click on

Transaction SM04 display the Active User List
1. The List may show a user as being active when the user has actually logged off. This condition is usually caused by a network failure, which cuts off the user, or that the User has not properly logged off the system. (For example, the user turned the PC switched off without logging off the system.)

2. A user may be on the system and needs to have their session terminated:
The user’s session may be “hung” and terminating the session is the only way to remove the user’s session.
The user may have entered into a “one way” menu path without an exit or cancel option.
This situation is dangerous, and the only safe option is to terminate the session.
How to terminate the user session?

Select the Session to be deleted and Click on the END session to end the Session

Authorization and Profile Maintenance:
Authorization means permission to perform a particular function in the SAP system. It is achieved by assigning authorization profile to users.
The various items used in authorizations are:
1. Authorization fields
2. Authorization object
3. Authorization
Authorization Profiles:
As a rule authorizations are not directly assigned to a user. Instead these authorizations are clubbed in an authorization profile and are then assigned to the user master records.
Types of Profiles:
1. Simple Profiles
A Simple profile is composed of only one Authorization.
2. Composite Profiles
Composite profiles are sets of authorization profiles. A composite profile can contain an
unlimited number of profiles.
Special profiles:
SAP_ALL
SAP_NEW
Profile Generator:
It allows generating profiles automatically.
Activity Group/Role Maintenance:
An activity group is a data container to generate authorization profiles and usually represents a job or a Role in the company.
Role Maintenance
Purpose
You must maintain roles when the roles in the standard delivery need to be adjusted or you need to create new roles.
Implementation
The SAP Standard contains a large number of roles. Check whether you can use a user role delivered in the standard before you define roles yourself.
Choose Tools - Administration - User maintenance - Info system - Roles - Roles by complex selection criteria in the SAP menu in the SAP Easy Access initial menu for an overview of the delivered roles.
You can also display a list of the delivered roles in the possible entries help for the Role field in the role maintenance (Tools - Administration - User maintenance - Roles).
You can copy and modify existing roles.
All maintenance tasks can be executed centrally by a single "superuser". Alternatively, you can distribute these tasks amongst more than one user to ensure greater system security.
Features
The system administrator chooses transactions, menu paths (in the SAP menu) or area menus, in the role maintenance (transaction PFCG). The selected functions correspond to the activities of a user or a group of users. The tree, which a system administrator creates here for a user group, corresponds to the user menu, which appears when the user to whom this role is assigned logs on to the SAP System.
The Profile generator automatically provides the required authorizations for the selected functions. Some of them have default values. Traffic lights show you, which values need to be maintained. Generate an authorization profile and assign the role to the users. The user menu appears when a user logs on to the SAP System.
Create Roles
Use
User-specific menus can be displayed for users after they have logged on to the SAP System by using either pre-defined roles or roles you created.
The role also contains the authorizations users need to access the transactions, reports, web-based applications and so on, contained in the menu.
You can assign a role to an unlimited number of users.
Procedure
The creation of a single role is described below.
To create a single role:
Enter the Role name and choose the pushbutton Create role in transaction PFCG

The roles delivered by SAP have the prefix 'SAP_'. Do not use the SAP namespace for your user roles.
SAP does not distinguish between the names of simple and composite roles. You should adopt your own naming convention to distinguish between simple and composite roles.

Enter a meaningful role description text. You can describe the activities in the role in detail.
You can create the user menu:
· from the SAP menu
You can copy complete menu branches from the SAP menu by clicking on the cross in front of it in the user menu. Expand the menu branch if you want to put lower-level nodes or individual transactions/programs in the user menu.
· from a role
this function copies a defined role menu structure in the same system into the current role.
You can also copy the menu structure of a role delivered by SAP. Click on the menu branches and copy them.
· from an area menu
You can copy area menus (SAP Standard and your own) into a role menu. Choose an area menu from the list of menus and copy the transactions you want.
·
· Transaction
You can put a transaction code in the user menu directly.
· Program
This function puts programs, transaction variants or queries in the user menu. They need not be given a transaction code.
ABAP Report
Choose a report and a variant. You can skip the selection screen.
You can generate a transaction code automatically and copy the report description by setting checkboxes.

Click +Transaction to assign transactions, programs and/or web addresses to the role in the Menu tab. The user menu which you create here is called automatically when the user to whom this role is assigned logs on to the SAP System.
Enter the T-codes to be added in below screen


Click Assign transactions Button to assign the transactions.
Select the Authorization tab

You can create the authorizations for the transactions in the role menu structure in the authorizations tab.

Click on to change Authorization Data.
SAP displays the below message to save the Role First.

Click on “YES” to Save the Role
The below screen will display the Object List

Provide the necessary Object authorizationand click on to generate the profile
to generate the profile
Enter the required profile name and Text or leave default provided by SAP


After providing the Profile name click to (✓ tick ) generate the Profile
 |

͑

Click on User Tab to assign the User.

Click on user comparison and click yes tab

Click on complete comparison tab


Click on Full administration
 Click on device Types .

Click on Page Formats

Click on Change
 icon to display below screen


 The newly created Page format is

Click on create icon to create new format type.

Fill the Format Type and select the newly created page format.

Click on back arrow and select device types to display the below screen.

Select required device type (ZEPESCP9) click on Formats to display screen.

Click on create icon to display the below screen and enter the format


Click on copy format icon .

Note: Copy the formats from Original device type and near format to newly created device type & format.


 to define the steps for the Background Jobs


External Program

Save the fully define job.
STANDARD JOBS:


To Check the Background jobs schedule go to the transaction code: SM37


We can check the job log by selecting the job and selecting the job log from the menu bar

Transport Procedure
Enter the T-code: stms_import
 The computer displays the below screen showing requests which are imported by(✓tick) mark and which are to be imported into the system by
 Mark.
Mark.
Select the request by using the mouse click on the Request Number and press “F9” to high light the request as shown


After the Request is marked with yellow color, click on to start the transport options
In the Import Transport Request Option Screen Enter the Target Client

Click on Options tab to enter the import options

Remove the [✓] from “Leave Transport Request in Queue for Later Import” and
Add the [✓] to “Overwrite Originals & Overwrite Objects in Unconfirmed Repairs”.
Click on to continue.
 Click on

Click on [Yes] to continue

Click refresh button after few minutes to see the

This completes the import of the request.
Click on user comparison and click yes tab
Click on complete comparison tab
Authorization and Role Maintenance
The system administrator chooses transactions, menu paths (in the SAP menu) or area menus, in the role maintenance (transaction PFCG). The selected functions correspond to the activities of a user or a group of users.
The tree which a system administrator creates here for a user group corresponds to the user menu which appears when the user to whom this role is assigned logs on to the SAP System.
The Profile generator automatically provides the required authorizations for the selected functions. Some of them have default values. Traffic lights show you which values need to be maintained.
Generate an authorization profile and assign the role to the users. The user menu appears when a user logs on to the SAP System.
The following are the features included in PFCG:
· Role Maintenance
· Flexible user menus
· Composite roles
· Distribution of roles
· Read roles from other systems
· Link a role to Knowledge Warehouse documentation
· Comparison of roles
· User administration
· Central User Administration
Global User Manager
Simplified ALE system environment setup for central user administration
· User groups
· Mass changes in user administration
· Alias names for users
· Reference user
Note : More than 1200 roles created by SAP. We can use the same or copy the role and assign to the users.
Some of the delivered roles include:
Basis: Authorization data administrator
Basis: Authorization profile administrator
Basis: User administrator
Basis: System administrator
Basis: Batch administrator
Basis: Database administrator
Basis: Customizing project member
Basis: ABAP developer
Basis: Uncritical basis authorizations for all users
Spool Administration
Type SPAD to enter into spooler administration menu
Click on Full administration
Click on Page Formats
Click on Change
Click on create icon
to create new page format.
Enter the Page format Name , Orientation, width & height and press save icon to save the
Page format.
The newly created Page format isPress BACK to get the spool administration main screen.
Click on format types to get the below screen
Click on create
icon to create new format type.Fill the Format Type and select the newly created page format.
Newly created format type
Click on back arrow and select device types to display the below screen.
Select required device type (ZEPESCP9) click on Formats to display screen.
Click on create
icon to display the below screen and enter the formatClick on copy format icon .
Background Processing
Scheduling background jobs in two ways. Using Tcode: SM36
Using menu Go to > wizard option
Background Processing overview:
Job Scheduling: This can occur in the tcode SM36 or in the ABAP editor use tcode SA38 and SE38 or through the programming interface or through the external command.
To Create and schedule a job:
· Assign a job name
· Specify a mail recipient
· Assign a target application server
· Set the job priority / job class
· High priority – Class A
· Medium priority – Class B
· Low priority – Class C
· Define the job steps, specify the abap program , external command, or external program
· Specify start condition (including time, triggering, event, etc) and if it periodic specify how frequent the job should run.
Steps to the BACKGROUND JOBS.
Click on
ABAP Program
External Command.
External Program
Save the fully define job.
STANDARD JOBS:
Periodic Jobs Required for Basis Housekeeping.
Recomm | ||||
Job Name | ABAP Program | Variant | ended | Purpose |
Repeat | ||||
Interval | ||||
SAP_REORG_JOBS | RSBTCDEL | Required; | Daily | Delete old background |
you must | jobs | |||
create a | ||||
variant. | ||||
SAP_REORG_SPOOL | RSPO0041 | Required; | Daily | Delete old spool |
you must | requests | |||
create a | ||||
variant. | ||||
SAP_REORG_BATCHINPUT | RSBDCREO | Required; | Daily | Delete old batch input |
This job may not run at the | you must | sessions | ||
same time as normal batch | create a | |||
input activity. Schedule this | variant. | |||
job for periods during which no | ||||
batch input sessions are run. | ||||
SAP_REORG_ABAPDUMPS | RSSNAPDL | Required; | Daily | Delete old dumps |
RSSNAPDL deletes old | you must | produced by ABAP | ||
dumps. To save the trouble of | create a | abnormal terminations. | ||
scheduling this job, you can | variant | |||
run the ABAP report | ||||
RSNAPJOB from the ABAP | ||||
editor. This report schedules | ||||
RSSNAPDL with the following | ||||
specifications: | ||||
Job name: RSSNAPDL | ||||
Variant name: DEFAULT (you | ||||
must create this variant) | ||||
Start time: 0100 AM | ||||
Repeat interval: Daily | ||||
SAP_REORG_JOBSTATISTI | RSBPSTDE | Required; | Monthly | Delete job statistics for |
C | you must | jobs not run since the | ||
create a | specified date (statistics | |||
variant | no longer needed since | |||
job was a one-time | ||||
occurrence or is no | ||||
longer run) | ||||
SAP_REORG_UPDATEREC | RSM13002 | None | Daily | Delete old completed |
ORDS | required | update records | ||
You need to run this job | (automatic delete | |||
ONLY: | deactivated); delete | |||
incomplete update | ||||
automatic deletion of update | records (automatic | |||
records after they have been | delete deactivated) |
processed. By default, | ||||||||||||||||||||||||||||||||||||||||||||||||||||||||||||||||||||||||||||||||||||||||||||||||||||||||||||||||||||||||||||||||||||||||||||||||||||||||||||||||||||||||||||||||||||
automatic deletion is | ||||||||||||||||||||||||||||||||||||||||||||||||||||||||||||||||||||||||||||||||||||||||||||||||||||||||||||||||||||||||||||||||||||||||||||||||||||||||||||||||||||||||||||||||||||
activated. This function is | ||||||||||||||||||||||||||||||||||||||||||||||||||||||||||||||||||||||||||||||||||||||||||||||||||||||||||||||||||||||||||||||||||||||||||||||||||||||||||||||||||||||||||||||||||||
controlled by system profile | ||||||||||||||||||||||||||||||||||||||||||||||||||||||||||||||||||||||||||||||||||||||||||||||||||||||||||||||||||||||||||||||||||||||||||||||||||||||||||||||||||||||||||||||||||||
parameter | ||||||||||||||||||||||||||||||||||||||||||||||||||||||||||||||||||||||||||||||||||||||||||||||||||||||||||||||||||||||||||||||||||||||||||||||||||||||||||||||||||||||||||||||||||||
rdisp/vb_delete_after_executio | ||||||||||||||||||||||||||||||||||||||||||||||||||||||||||||||||||||||||||||||||||||||||||||||||||||||||||||||||||||||||||||||||||||||||||||||||||||||||||||||||||||||||||||||||||||
n; or | ||||||||||||||||||||||||||||||||||||||||||||||||||||||||||||||||||||||||||||||||||||||||||||||||||||||||||||||||||||||||||||||||||||||||||||||||||||||||||||||||||||||||||||||||||||
automatic deletion of | ||||||||||||||||||||||||||||||||||||||||||||||||||||||||||||||||||||||||||||||||||||||||||||||||||||||||||||||||||||||||||||||||||||||||||||||||||||||||||||||||||||||||||||||||||||
incomplete update records | ||||||||||||||||||||||||||||||||||||||||||||||||||||||||||||||||||||||||||||||||||||||||||||||||||||||||||||||||||||||||||||||||||||||||||||||||||||||||||||||||||||||||||||||||||||
(records partially created | ||||||||||||||||||||||||||||||||||||||||||||||||||||||||||||||||||||||||||||||||||||||||||||||||||||||||||||||||||||||||||||||||||||||||||||||||||||||||||||||||||||||||||||||||||||
when an update header is | ||||||||||||||||||||||||||||||||||||||||||||||||||||||||||||||||||||||||||||||||||||||||||||||||||||||||||||||||||||||||||||||||||||||||||||||||||||||||||||||||||||||||||||||||||||
created and saved but the | ||||||||||||||||||||||||||||||||||||||||||||||||||||||||||||||||||||||||||||||||||||||||||||||||||||||||||||||||||||||||||||||||||||||||||||||||||||||||||||||||||||||||||||||||||||
generating transaction then | ||||||||||||||||||||||||||||||||||||||||||||||||||||||||||||||||||||||||||||||||||||||||||||||||||||||||||||||||||||||||||||||||||||||||||||||||||||||||||||||||||||||||||||||||||||
ends abnormally). By default, | ||||||||||||||||||||||||||||||||||||||||||||||||||||||||||||||||||||||||||||||||||||||||||||||||||||||||||||||||||||||||||||||||||||||||||||||||||||||||||||||||||||||||||||||||||||
automatic deletion is | ||||||||||||||||||||||||||||||||||||||||||||||||||||||||||||||||||||||||||||||||||||||||||||||||||||||||||||||||||||||||||||||||||||||||||||||||||||||||||||||||||||||||||||||||||||
activated. This function is | ||||||||||||||||||||||||||||||||||||||||||||||||||||||||||||||||||||||||||||||||||||||||||||||||||||||||||||||||||||||||||||||||||||||||||||||||||||||||||||||||||||||||||||||||||||
controlled by system profile | ||||||||||||||||||||||||||||||||||||||||||||||||||||||||||||||||||||||||||||||||||||||||||||||||||||||||||||||||||||||||||||||||||||||||||||||||||||||||||||||||||||||||||||||||||||
parameter rdisp/vbreorg; or | ||||||||||||||||||||||||||||||||||||||||||||||||||||||||||||||||||||||||||||||||||||||||||||||||||||||||||||||||||||||||||||||||||||||||||||||||||||||||||||||||||||||||||||||||||||
processing of U2 update | ||||||||||||||||||||||||||||||||||||||||||||||||||||||||||||||||||||||||||||||||||||||||||||||||||||||||||||||||||||||||||||||||||||||||||||||||||||||||||||||||||||||||||||||||||||
components after the | ||||||||||||||||||||||||||||||||||||||||||||||||||||||||||||||||||||||||||||||||||||||||||||||||||||||||||||||||||||||||||||||||||||||||||||||||||||||||||||||||||||||||||||||||||||
processing of the associated | ||||||||||||||||||||||||||||||||||||||||||||||||||||||||||||||||||||||||||||||||||||||||||||||||||||||||||||||||||||||||||||||||||||||||||||||||||||||||||||||||||||||||||||||||||||
U1 updates. This function is | ||||||||||||||||||||||||||||||||||||||||||||||||||||||||||||||||||||||||||||||||||||||||||||||||||||||||||||||||||||||||||||||||||||||||||||||||||||||||||||||||||||||||||||||||||||
controlled by system profile | ||||||||||||||||||||||||||||||||||||||||||||||||||||||||||||||||||||||||||||||||||||||||||||||||||||||||||||||||||||||||||||||||||||||||||||||||||||||||||||||||||||||||||||||||||||
parameter rdisp/vb_v2_start. | ||||||||||||||||||||||||||||||||||||||||||||||||||||||||||||||||||||||||||||||||||||||||||||||||||||||||||||||||||||||||||||||||||||||||||||||||||||||||||||||||||||||||||||||||||||
For more information, see | ||||||||||||||||||||||||||||||||||||||||||||||||||||||||||||||||||||||||||||||||||||||||||||||||||||||||||||||||||||||||||||||||||||||||||||||||||||||||||||||||||||||||||||||||||||
Managing Updates. | ||||||||||||||||||||||||||||||||||||||||||||||||||||||||||||||||||||||||||||||||||||||||||||||||||||||||||||||||||||||||||||||||||||||||||||||||||||||||||||||||||||||||||||||||||||
SAP_COLLECTOR_FOR_JO | RSBPCOLL | None | Daily | Generate runtime | ||||||||||||||||||||||||||||||||||||||||||||||||||||||||||||||||||||||||||||||||||||||||||||||||||||||||||||||||||||||||||||||||||||||||||||||||||||||||||||||||||||||||||||||||
BSTATISTIC | required | statistics for background | ||||||||||||||||||||||||||||||||||||||||||||||||||||||||||||||||||||||||||||||||||||||||||||||||||||||||||||||||||||||||||||||||||||||||||||||||||||||||||||||||||||||||||||||||||
jobs | ||||||||||||||||||||||||||||||||||||||||||||||||||||||||||||||||||||||||||||||||||||||||||||||||||||||||||||||||||||||||||||||||||||||||||||||||||||||||||||||||||||||||||||||||||||
SAP_COLLECTOR_FOR_PE | RSCOLL00 | None | Hourly | Collect system | ||||||||||||||||||||||||||||||||||||||||||||||||||||||||||||||||||||||||||||||||||||||||||||||||||||||||||||||||||||||||||||||||||||||||||||||||||||||||||||||||||||||||||||||||
RFMONITOR | required | performance statistics | ||||||||||||||||||||||||||||||||||||||||||||||||||||||||||||||||||||||||||||||||||||||||||||||||||||||||||||||||||||||||||||||||||||||||||||||||||||||||||||||||||||||||||||||||||
This job was previously called | ||||||||||||||||||||||||||||||||||||||||||||||||||||||||||||||||||||||||||||||||||||||||||||||||||||||||||||||||||||||||||||||||||||||||||||||||||||||||||||||||||||||||||||||||||||
COLLECTOR_FOR_PERFOR | ||||||||||||||||||||||||||||||||||||||||||||||||||||||||||||||||||||||||||||||||||||||||||||||||||||||||||||||||||||||||||||||||||||||||||||||||||||||||||||||||||||||||||||||||||||
MANCE_MONITOR. Please | ||||||||||||||||||||||||||||||||||||||||||||||||||||||||||||||||||||||||||||||||||||||||||||||||||||||||||||||||||||||||||||||||||||||||||||||||||||||||||||||||||||||||||||||||||||
schedule this job under the | ||||||||||||||||||||||||||||||||||||||||||||||||||||||||||||||||||||||||||||||||||||||||||||||||||||||||||||||||||||||||||||||||||||||||||||||||||||||||||||||||||||||||||||||||||||
new name. | ||||||||||||||||||||||||||||||||||||||||||||||||||||||||||||||||||||||||||||||||||||||||||||||||||||||||||||||||||||||||||||||||||||||||||||||||||||||||||||||||||||||||||||||||||||
RSCOLL00 schedules all of | ||||||||||||||||||||||||||||||||||||||||||||||||||||||||||||||||||||||||||||||||||||||||||||||||||||||||||||||||||||||||||||||||||||||||||||||||||||||||||||||||||||||||||||||||||||
the reports that need to run for | ||||||||||||||||||||||||||||||||||||||||||||||||||||||||||||||||||||||||||||||||||||||||||||||||||||||||||||||||||||||||||||||||||||||||||||||||||||||||||||||||||||||||||||||||||||
the performance monitor. | ||||||||||||||||||||||||||||||||||||||||||||||||||||||||||||||||||||||||||||||||||||||||||||||||||||||||||||||||||||||||||||||||||||||||||||||||||||||||||||||||||||||||||||||||||||
RSCOLL00 uses table TCOLL | ||||||||||||||||||||||||||||||||||||||||||||||||||||||||||||||||||||||||||||||||||||||||||||||||||||||||||||||||||||||||||||||||||||||||||||||||||||||||||||||||||||||||||||||||||||
to determine what to run. See | ||||||||||||||||||||||||||||||||||||||||||||||||||||||||||||||||||||||||||||||||||||||||||||||||||||||||||||||||||||||||||||||||||||||||||||||||||||||||||||||||||||||||||||||||||||
information on setting up | ||||||||||||||||||||||||||||||||||||||||||||||||||||||||||||||||||||||||||||||||||||||||||||||||||||||||||||||||||||||||||||||||||||||||||||||||||||||||||||||||||||||||||||||||||||
RSCOLL00. | ||||||||||||||||||||||||||||||||||||||||||||||||||||||||||||||||||||||||||||||||||||||||||||||||||||||||||||||||||||||||||||||||||||||||||||||||||||||||||||||||||||||||||||||||||||
Users, Authorizations, and Client Specificity of House-Keeping Jobs
|
SAP_COLLECTOR_FOR_PER | No, but must | Job user | No special authorizations |
FMONITOR | run in client 000 | must be user | required |
DDIC. |
System Log:
System log is used to pinpoint and correct errors occurring in your system and its environment. The following are the system log available:
· Local system log
· Remote system log
· All remote system logs
· Central system log
The System Log utility has two modes: normal and expert. The expert mode is intended primarily for use by SAP should it become necessary to analyze a problem in your system. To enter expert
mode, choose Edit | Expert mode. | |
Setting expert mode selections: | ||
Attribute | Description | |
Program | Restricts the display to messages from one program. | |
Problem classes | Limits the report to a specific message type. You can enter one or | |
more of the following message classes: | ||
K system kernel messages from the Basis system | ||
S status messages | ||
T transaction messages | ||
W warning messages | ||
X other types of messages | ||
Specifying Log File parameters:
Parameter | Definition |
rslg/central/file | Specifies the active central log filename. The default filename is: |
SLOGJ | |
rslg/central/old_file | Specifies the old central log filename. When a log switch occurs, the |
active log file is copied onto the old log file. The default filename is: | |
SLOGJO | |
rslg/local/file | Specifies the local log filename. The default filename is: |
SLOG<SAPSYSTEM number> | |
Standard Jobs |
To Check the Background jobs schedule go to the transaction code: SM37
We will get all the above category jobs after executing above transaction code
We can check the job log by selecting the job and selecting the job log from the menu bar
Terminating Process:
You should explicitly terminate the collect and send system log processes as part of any shutdown or reboot of the host operating system. If you start processes with the start-up profile, the processes are shut down automatically by a system shutdown. The log system processes are not affected by an abnormal termination of the R/3 System. Abnormal termination is termination of the work and dispatcher processes.
Effects of Operating System Shutdowns:
If you shutdown a system without terminating the collect process or if the system crashes, the current central log may become corrupted. Corruption occurs if the collect process is writing a message to the log file when the shutdown occurs.
If a log becomes corrupted by an incomplete message or other problem, you must manually correct the problem by repairing or deleting the log file. The log system processes respond with error messages to a corrupted file.
Locking and Unlocking Processes:
Locking a process prevents it from being started. Send processes, in particular, do not start automatically if you lock them. You should lock a process when you do not want system log messages forwarded or if the entire R/3 System is running in a single instance. Use the following procedure to lock processes:
1. Stop the process that you wish to lock.
2. Enter the value -1 in the process’s pidfile.
SYSTEM LANDSCAPE
Define System Landscape
The purpose of this activity is to establish the system landscape. The system landscape consists of the SAP Systems and clients that will enable you to adapt the SAP standard software to meet the needs of the company. This process begins with the first SAP installation, customizing and development to meet the business needs, testing and verification, and finally to the start of productive operation.
The many things to consider include:
· The required number of systems and clients needed
· Specific client roles and the appropriate client settings
· Acceptable levels of quality assurance and testing
· Management of all customer development and customizing settings
· Use of Preconfigured Systems as an implementation accelerator
The system landscape must be defined. Definition involves stating the purpose of each SAP System, providing each system with a system identifier, and establishing a transport route between the systems for the distribution of Customizing and development efforts. Clients are then distributed in this landscape. Once the system landscape has been defined, an implementation strategy is created for both the setup and maintenance of the systems and clients within this landscape.
Although many implementations begin with a single SAP System (knowing additional systems will be added), the system landscape should be established from the beginning. This helps to ensure that all Customizing and development changes are recorded and correctly distributed to the necessary systems.
The outcome of this activity is:
· Design of the company’s system landscape, including its setup and maintenance strategy
· Design of the company’s system landscape, including:
· The definition of the required systems and clients
· A strategy for the setup of the system landscape (systems and clients)
· A strategy for the maintenance of the system landscape (systems and clients) during the implementation project
· A strategy for the continuous improvement needed after the start of production
Determine Required Systems
The purpose of this task is to determine the number of systems needed for your SAP implementation. SAP recommends that customers use a three system landscape, dedicating separate systems to development activities, to quality assurance testing, and to the actual production environment. Some customers may have constraints that require an implementation that uses a one or two system landscape. Others may find that more systems are necessary (for example, a large, multinational implementation).
Once all names and roles have been assigned to the systems making up the system landscape,
you must define and establish the transport route for all changes that originate in the development system.
Procedure
3. Define the system landscape:
The system landscape must be defined, regardless of the landscape chosen. Definition involves stating the purpose of each SAP System, providing each system with a system identifier, and establishing a transport route between the systems for the distribution of Customizing and development efforts.
Although many implementations begin with a single SAP System (knowing additional systems will arrive), the system landscape should be established from the beginning. This helps to ensure that all Customizing and development changes are recorded and correctly distributed to the necessary systems.
4. Define system purposes:
While there are various systems that can be planned in the implementation of the SAP System, SAP recommends the following systems:
· Development system.
· All Customizing and development takes place in the development system.
· Quality assurance system
· Change requests from the development system are imported into the quality assurance system where testing and validation can be performed without affecting the production system.
· Production system
· All changes once verified and signed off from the quality assurance system are imported into the production system.
· Additional systems (not required) depending on the need or your implementation may include:
· Sandbox system
· Training system
· Technical sandbox system
3. Determine system names:
All SAP Systems must be provided a system identifier, also known as the system ID or SID. A SID must be a combination of three alpha-numeric characters. Only uppercase letters are allowed. The first character must be a letter (not a digit). In addition, some names are reserved and you cannot assign them to your SAP system. Refer to the SAP Installation manual for the list of reserved SID names.
Although a system may not physically exist yet, its identifier should be determined from the start. This ensures that the proper import queue is maintained for that system. This requires, for example, establishing a virtual system for the production system until the physical hardware arrives and is installed.
Result
Determine Client Deployment Strategy
The purpose of this task is to determine the client deployment strategy. SAP implementation environments require different clients with unique data environments. A client is an organizationally independent unit within an SAP System. Clients have their own separate data environment, which includes customizing settings, user master records, and application data (such as master data and transactional records). These clients’ roles need to be defined and distributed to the system landscape prior to any development and IMG activities.
The clients required for every implementation include a development client, a quality assurance client, and a production client. If you use a preconfigured system as a base for configuration, then it must be installed across all systems in the landscape.
Each client in the system landscape requires its own setup and maintenance efforts. Therefore, the more clients are used during implementation, the more administrative effort is required to manage the system landscape. The trade-off between environmental needs and management efforts is the decision and responsibility of project management.
The setup of a system landscape requires a well-defined strategy. When establishing a planned approached for building a landscape, the distribution of the following data types should be considered:
· General, cross-client customizing settings
· Client-specific customizing settings
· Repository objects
· Application data (application data consists of both transaction data and master data)
Regardless of the tools and strategy used to set up the system landscape, it is recommended that a consistent strategy is defined and applied to all subsequent systems.
Procedure
1. Define client roles.
SAP has defined common client roles. These roles include:
· Required roles:
· Development client
· Quality assurance client
· Production client
· Additional client roles:
· Sandbox client
· Unit test client
· Client for the storage of verified master data and customizing data
· Training client
· Client for pre-production data
In Business Information Warehouse (BW) landscapes, each system will have only one client. The vast majority of the objects in BW are client independent, therefore the addition of more than one client to a system provides no organizational or data isolation benefit. In BW landscapes the additional client roles mentioned above should not be used in the Client Deployment Strategy.
2. Distribute clients to the system landscape.
Every SAP application requires certain central resources that are used for implementing the basic functional elements. These include the complete SAP Repository, and also a
number of general customizing settings, which have to be cross-client. Thus, even though clients are considered organizationally independent data environments, clients within the same SAP System do share certain central resources. It is recommended that each of the required clients be in a separate system. All additional clients required for implementation are distributed to an appropriate system.
Some examples include:
· A sandbox client would either be in its own system
· A unit test client only has value in a development system.
· A training client can be in the quality assurance system or in a training system.
Therefore, restrictions on the distribution, administration, and development of individual clients within the system landscape require careful consideration of the:
· Changing of cross-client customizing settings
· Development and modification of repository objects
· Security of critical data
· Existence of a true quality assurance environment
· Availability of a stable production environment
· Performance needs for each system
3. Determine the client number for each required client in your SAP landscape. Each client within a single SAP System is required to have a unique, three-digit client number for identification purposes.
The following clients are reserved by SAP:
· Client 000 is the standard SAP client used to store defaults for all tables and sample organizational data. Because this client is updated during every system and release upgrade, you must not work in this client.
· Client 066 is used by SAP for remote services, such as EarlyWatch.
· Client 001 is also a standard SAP client, and is identical to client 000 initially. Prior to the start of customizing and development, it is recommended that a copy be made of client 000. customizing and development can then begin in this copy. (See tips below)
·
When distributing clients among different SAP Systems, the use of common client numbers is advantageous. When transporting, changes are released from one client and, by default, are transported to the same client number in the downstream systems. Although the import process allows you to select the target client, using identical client numbers across the SAP Systems in your landscape can prevent errors and confusion.
4. Define client attributes.
Every client has a variety of client attributes that have to be maintained to protect and restrict a client from undesired activities and changes.
Attributes that need to be established for every client include:
· Client role
· Changes and transports for client-dependent objects
· Client-independent object changes
· Protection: Client copy and comparison tool
· Restrictions
Use the SAP standard menu path:
Here, these attributes are established, based on the role of the client itself, as well as the objective of the SAP System.
Result
· Design of the complete system landscape including client roles and client distribution
After installation, the SAP System contains the SAP standard clients 000, client 001 and client 066. While you are not able to use client 000 and client 066 for implementation efforts, you are able to begin using client 001. However, note that client 001 will not contain settings applied during installation of add-ons. For example, if you imported the languages French and Spanish after installation, these languages are only available in client 000. There is a special SAP transaction (transaction SMLT) that "pulls" these additional languages into other clients. Therefore, if you do want to use client 001, verify that any additional settings installed were also integrated into client 001. Because of the concern for what was installed during post-installation activities and in an attempt to preserve SAP’s delivered client, many implementations choose to create new clients as a copy of client 000. This guarantees that all installed languages will be available in the new clients.
Define Transport Strategy
The purpose of this task is to choose a transport strategy optimally suited to your requirements. SAP recommends that you follow the transport strategy while you plan and set up your system landscape. Earlier, in the task Define Change Request Management, the overall change management procedures were established.
All users working as developers must know the transport strategy and stick to certain guidelines.
The transport strategy may change during an SAP implementation project, depending which phase of the project you are in.
Procedure
1. Client Landscape and Transport Routes:
Once a system landscape has been established and clients exist, you must decide which parts of the project are to be developed in which clients, and into which clients you want to transport your changes. To transport your changes, create transport routes between clients or systems. Client-specific transport routes can be defined by using Extended Transport Control. You must always use transport routes, regardless of which transport strategy you choose.
2. Define a strategy for maintaining a system landscape.
All changes need to be distributed in the form of change requests. Change request management is the only recommended procedure for maintaining the system landscape. Every implementation environment requires a well-defined maintenance strategy that provides both a schedule for the importing of changes into each client, and the quality assurance and testing verification at specific stages.
3. Define responsibilities and transport schedule for importing change requests. Determine who will be responsible for importing change requests into clients and systems and when the imports will be done. Define a transport schedule to minimize dependencies between the objects that different developers on the same project may be working on. So that developments are consistent in other systems, all the changes made by the developers must be transported at the same time. Otherwise, you may cause inconsistencies; for example, if a developer creates a table that references a data element created by another developer. If the change request that contains the table is then imported into a target system in which the data element does not exist, the import will encounter errors. One way of keeping these dependencies under control is to have a fixed transport schedule, in which all changes released up until a certain fixed date are transported into a client or SAP System.
This method is particularly suitable for the early phases of an SAP project when many changes are being made to the system. A transport schedule in a system
landscape with a development system, quality assurance system and production system could be as follows:
· All changes are imported once an hour into the quality assurance system.
· All requests are imported once a week into the planned production system.
· This schedule lets the developers test their changes almost immediately in the QA system, and correct any errors. The developers' aim is to consolidate their changes in the QA system before they are due to be imported into the production system.
4. Define responsibilities for releasing change requests.
The Business Process Team Lead should perform all releases of change requests. User authorization and ownership prevents others from releasing change requests for which they are not responsible.
5. Define Quality Assurance
If you work with mass transports, all requests released by the developers are imported into production systems. You can implement the TMS Quality Assurance procedure to prevent unchecked changes from being transported. The procedure makes sure that each change request is approved before it is imported into the production system.
You should use the TMS Quality Assurance procedure even if you are using single transports.
Result
This procedure will result in policies and procedures being defined for transporting within the system landscape.
· If you are working on several different development projects at the same time, you cannot always estimate which of the projects will go live at which time. If your development projects do not overlap, or only overlap a little, you can use projects to control your transports, and then use different transport schedules for different projects. For example, if a component is just about to go live, you may need to import one project into the production system particularly frequently, with other projects only being imported into the QA system first, and into the production system later.
· Testing | changes | before | releasing | the | change | request. |
It is possible, with the client admin. Special function, Copy Transport | ||||||
Request, | to copy the | contents | of a change | request (released or not | ||
released) to another client within the same SAP system. This allows for testing the changes that were made prior to the release of the change request. Optionally, the change request can be unit tested in the current client.
· The client copy, within the same system, is a common activity in SAP systems (an exception is BW, which only has one client). This could be a regular event on a development system with a sandbox client getting refreshed with a copy of the master configuration client, for example. A
· If you want to make specific single transports into your systems, but would rather have this done by the system administrator, SAP recommends that you use the transport workflow. This method automatically triggers a workflow when you release a change request. The workflow ensures close communication between development and administration.
· Familiarize yourself with the features of the Transport Management System (TMS) to utilize and take advantage of the capabilities that it can provide.
Transport Procedure
Enter the T-code: stms_import
Select the request by using the mouse click on the Request Number and press “F9” to high light the request as shown
After the Request is marked with yellow color, click on to start the transport options
In the Import Transport Request Option Screen Enter the Target Client
Click on Options tab to enter the import options
Remove the [✓] from “Leave Transport Request in Queue for Later Import” and
Add the [✓] to “Overwrite Originals & Overwrite Objects in Unconfirmed Repairs”.
Click on to continue.
Click on [Yes] to continue
You can see the symbal against the request
Click refresh button after few minutes to see the
This completes the import of the request.
CLIENT ADMINISTRATION
Maintaining clients and Logical system
Enter the transaction code: SCC4

Client settings for a development Client (Golden Client):

Client settings for a development Client (Pre Test Client):

The client settings for a Quality & Production clients and testing client:

Copying clients between within the same SAP systems:
Procedure:
5. Choose Tools Administration Local
copy or we can use the Transaction code : SCCL
For copying clients, R/3 offers copy profiles that make it easier for you to select and combine the components you want to copy. SAP delivers the following copy profiles:
SAP Copy Profiles
Copy profile | Description |
SAP_USR | Copies user master records and profiles only. |
SAP_CUST | Copies all Customizing tables, including user profiles. |
SAP_UCUS | Copies all Customizing tables, including user data and user profiles. |
SAP_ALL | Copies all data belonging to a client. |
6. |


7. Select a profile to copy which matches your requirements.
If you want to use the selected profile as a default setting, choose value.

8. Select the source client from the dropdown list

9. Start the copy process.
Normally, you should start this procedure as a background job. However, if you
only want to copy user data and profiles, you can run it online.
Copying clients between SAP Systems
Procedure:
When you copy a client from one system to another, the data is transferred directly
via the RFC interface - there is no intermediate storage on hard disk:
1. Choose Tools Administration Remote copy or we can use the Transaction code :
SCC9
2. Select a copy profile that matches your requirements.

3. Enter the RFC destination.
4. Start the copy process.
Normally, you should start this procedure as a background job. However, if you only want to copy user data and profiles, you can run it online.
Transporting clients between sap systems:
You are no longer required to transport clients before you can copy clients between
systems. Instead, you can make a remote copy. Nevertheless, SAP will provide
continued
support for the transport function
During client transports, all languages of the source system are transported. They overwrite the texts in the target system. Therefore, all texts are lost in the target system whose language exists only in the target system but not in the source system.
Procedure: | ||
Choose Tools Administration | ent transport Client | |
export or we can use the transaction codes: SCC8 or SCC7 | ||
Select a copy profile that matches your requirements | ||
Up to three transports are performed: | ||
Transport | Description | |
<sid>KO<no> | Cross-client data. | |
<sid>KR<no> | Client-specific data. | |
<sid>KX<no> | Texts and forms. | |
The data export is performed automatically. The output of the export includes the name of the transport requests that are to be imported.
To adapt the runtime environment to the current state of the data, you may need to perform post processing activities.
Displaying Copy Log:
Procedure:
10. Choose Tools Administration  or we Can use the transaction code: SCC3

The system displays a list of all client copies, where the logon client was identical to the target client

4. To display the detailed log for a run, position your cursor on the appropriate run, and choose.
5 The system displays a list that contains the following information:
Copy type
Profile
Status
User
Tables where copy problems occurred
Statistical info
6. To view further details for the run, choose Details.
The system displays a selection list. From this list, you can retrieve information on
the number of tables copied or the number of exit programs, for example.
7. If copy problems occurred for a table during a local client copy, you can choose Copy errors to copy these tables again.
Deleting clients:
Procedure:
1. Logon to the client to be deleted.
2 Choose tools or we can use the transaction code:SCC5

Restarting client copy:
If a client copy terminates for technical reasons, for example, due to a database
shutdown, you can always restart the process from the point of termination:
· If you start a client copy or a client transport, and the previous process terminated
prematurely, the system automatically proposes restart mode with the same
parameter settings used for the copy that caused the termination.
If the restarted process fails, the log displays a special note indicating possible reasons for the error. Before you try to restart the program once again, eliminate the error
Error Handling:
Client copies usually involve handling large volumes of data. This places a considerable strain on the CPU and storage resources of the machine.
Depending on the data involved and the system configuration, the most likely errors are listed below, together with the steps required to correct them.
Error Handling in Client Copy and Transport
Error | Cause | Solution | Remarks |
Write error in target client | Usually a | Check system log to | |
(1). | tablespace | determine name of | |
overflow. | tablespace. Extend | ||
tablespace and repeat | |||
entire copy. You do not | |||
have to delete it first. | |||
System log messages | None. | These messages | |
"Syn. MC maintenance | document special | ||
deactivated fully" and | functions that are | ||
"Buffer TABL/TABLP | used to improve | ||
reset". | performance and | ||
guarantee | |||
consistency. | |||
Termination in exit | Run log display to | Client copy | |
program after runtime of | determine name of last | program has not | |
several hours | exit program that has | terminated, but an | |
(explanation in ABAP | caused termination. | application error | |
runtime error log). | has caused | ||
termination. |
R/3 Repository Information System
You use the Repository Information System to search for objects in the R/3 System. To
access the R/3 Repository Information System from the ABAP Workbench, choose
Overview Repository Infosys.
The object categories in the R/3 system are odelling objects, ABAP dictionary
objects, Programming objects and environment objects.
Where Used-Lists:
The Repository Information System tracks where an object is defined and where it is
used. You can create a where-used list for an object in any of the Workbench tools by
choosing Utilities Where-used list.
When you choose the Where-used list function, the system asks you for search
criteria. For example, Searching a program or module.
Environment Analysis:
You use this function to determine the external references for an object. External
references are those objects to which your object refers but which are not defined within
the object itself. Environment analysis is a useful function if you want to see how well an
object is encapsulated. A fully encapsulated object has no external references.
It is particulary important to determine an object’s environment before transporting
objects into other systems. You must ensure that the required environment will be
present in the target system after the transport (in other words, your object must not
reference local objects).
CCMS – Computing Centre Management System
OP Mode creation:
Tools à Ccms à Configuration àOperation mode/Instances - RZ04
Work process Distribution:
Work process | Day | Night |
Dialog | 6 | 3 |
Background | 2 | 5 |
Update | 2 | 2 |
Enqeue | 1 | 1 |
Spool | 1 | 1 |
Operation Mode Switching: (SM63)
· Normal (24hr cycle)
· Exception (A Particular day)
Database Monitor: (ST04)
Tools à Ccms à Control à Performance à Database à Activity
Used to check the important performance indicators in the database system. Such as database size, database buffer, quality and database indexes.
Memory Usage Parameters:
Current Memory – Size of the virtual memory used for all the SQL, since its
started Max. Memory – Size of the virtual memory used for all the SQL, since
its started Memory Setting –
· FIXED, If min. Memory is equivalent to max. Memory SQL server will use a constant amt of memory. If R/3 and Database is on the same server, it is recommended
· AUTO, It allocated memory dynamically 4MB to 2PB (Peta Byte), it is recommended for a Standalone database server
· RANGE, It dynamically allocates memory between min and max memory
Total SQL Connection – It includes R/3 connection, Sql agent, and Potential query analyzer corrections
R/3 Connection – No of connection from the SAP work process
Free Buffers – No of free data buffer available. It can be used either by the data cache or by the procedure cache
Procedure Cache – It contains stored procedure and Execution plan etc Data Cache Size – Data and Index Pages
Data Cache hit ratio – Percentage of Pages found in the cache, the recommended value is above 95%
Space Usgae – Database space is organized in several database files on disk Total Data size – R/3 database size
Total Log Size – R/3 Log size
Free Space – R/3 Database and Log Free size
Server Engine/Elapsed:
CPU Busy – No of SQL server threads, It should be always less than
70% CPU Idle – It should be grater than CPU Busy divided by 2
I/O Busy – No of seconds that SQL server has spent doing I/O operations
Daily Checklist:
SM50 – Work Process
Process that processes a particular R/3 request DVBES, it displays the following information as follows
No – Internal id of a process Ty – Type of work process
PID – Process id of the work process (OS level) Status – The current status of the work process
· Running (executing a request)
· Waiting (idle and waiting for work)
· Hold (held for a single user, if too many processes in hold status, then system performance suffers)
· Ended (aborted)
Reason – If it is in hold status, it gives the reason as follows
· CPIC
· Enque
· Update
· RFC
· GUI
· PRIV
Start – Indicates whether process should start automatically or manually, you can change the status from (Process à Restart after error à Yes/No) Normally restart status should be yes Err – Indicates how many times your work process is aborted
Sem – Indicates the number of the semaphore for which work process is waiting, Normally this should be empty, if one or more semaphores frequently appears evaluate the performance monitor
CPU – Cummulative CPU time taken since the start of work process
Time – Elapsed time
Program – Abap program or report which is currently executed
Client – Cleint Id
User – Username
Action – Action that is being performed
Table – If it is accessing the table, it shows the table name
SM51 – SAP Servers
To display a list of application servers which is registered themselves with SAP message server. The following details are displayed: Server Name, Host name and Type of work process
Ex: obtdev2_TC1_00, obtdev2, Dialog Update Enqueue Backg Spool Upd2
SM66 – System wide work process overview
Monitor all work process load on all active instances
Identify locks in the database (lock waits)
TU02 – Profile Parameter changes
To confirm profiles are modified only by the authorized users. It is not a daily activity
SM04 – User overview
Display all the active users n the system who are logged into the application server, it gives the following details
Client, User, Terminal, Tcode, Time, Sessions, Type of connection (GUI/RFC) Tasks can be performed:
· Delete a user session
· Terminate a Process
· Take over a user’s session
SM13 – Update Records
Used to display aborted updates, it should never occur in the production server.
SM12 – Lock entries
SM37 – Job Management / Job Overview
Managing background jobs, used to display jobs in all clients. The following are the parameters to be specified for job overview:
Job Name, User Name, Status of the job, Planned or Scheduled time, Name of the event, Name of the ABAP program, when and how often the program should run.
Management Tasks:
· Copying an existing job
· Rescheduling
· Cancelling/Deleting
· Releasing
SM21 – System Log
The system log utility has two modes:
1. Normal Mode (default)
2. Expert Mode (Edità Expert mode) Program Clauses:
· | K | - | Kernel messages from the Basis system |
· | S | - | Status messages |
· | T | - | Transaction Messages |
· | W | - | Warning Messages |
· | X | - | Other Messages |
Specifying Log File pathnames:
1. Rslg/central/file – Specifies the active central log filename, default is SLOGJ
2. Rslg/central/old_file – When a log switch occurs, the active log file is copied into the old log file, default is SLOGJO
3. Rslg/local/file – Specifies the lcoal log filename, default is SLOG<sap system no>
BACKUP-RESTORE
BACKUP PROCEDURE
Offline Backup:
Execute the below command to perform the backup to disk
Login to Remote Desktop with <sidadm> (ebdadm)
Ensure that all users are logged-off from the SAP by checking the SM04 users list.
Stop SAP
Open Command prompt

Connect the database with below command
Isql –Usapsa –SSED –X
Press Enter
Type master Password (XXXX)

Enter below command for backup to disk
1>dump database SED to “path\filename.dmp”
2>go


SAP Router Configuration
Logon to Sap Marketplace
http://service.sap.com\SAPROUTER-SNCADD

Click on [OK]
Enter OSS User Name & Password and click OK


Create a temporary directory (SAY "SNCTEMP") and down load the cryptographic
software
Download the SAPCAR file
Uncompress the downloaded car file "011000358700002932482003E.CAR" into
tempfolder
Sapcar –xvf 011000358700002932482003E.CAR
The following files will be uncompressed
These two into SNCTEMP root
ticket
LEGAL.TXT
and this directory "ntintel
"ntintel" contains
sapgenpse.exe
sapcrypto.dll
Copy the above 4 files into C:\SAPROUTER directory
C:\SAPROUTER should not be containing any other directory
Set the environment variable
SECUDIR=<DIRECTORY_OF_SAPROUTER>
eg:
SECUDIR=C:\SAPROUTER
Logoff and logon to activate the environment variable
get the Distinguised Name from sap net
Go to Command Prompt
All the commands should be executed from..
"C:\SAPROUTER" only
execute the following command to generate Certificate Request
Execute the below with your "Distinguised name"
On internet


Copy the registered Distinguished Name and execute the below command.
sapgenpse get_pse -v -r certreq -p local.pse "CN=server7, OU=00001115752,
OU=SAProuter, O=SAP, C=DE"
the data in doubble quotes is the Distinguished name
Enter a pin no. Just any thing and remember that
Two files "certreq" and "local.pse" will be created
Click on Continue button to submit the below certificate.
display the

display the certificate request file certreq
and submit the contents starting from
-----BEGIN CERTIFICATE REQUEST----
MIIBmTCCAQICAQAwWTELMAkGA1UEBhMCREUxDDAKBgNVBAoTA1NBUDESMBAGA1UE
CxMJU0FQcm91dGVyMRMwEQYDVQQLEwowMDAwODEyOTc2MRMwEQYDVQQDEwpwYXJh
c2Jhc2lzMIGfMA0GCSqGSIb3DQEBAQUAA4GNADCBiQKBgQD8XhF+mevUxP6y/CA0
AGYIOcT0tfXRfRVHs+iIoi4CI4k0CpR2u5A1m6BLFFfFQjezLqYHHWU5IdjBb2Sz
Qv5s2ND9FAQtIEtuPnJUeGJNG8TfCUSbizWVpHkTobtyAWaEQkkhZ7IiBwKYuhyz
IUvreN32uUruzKPkOBcRwkX2qQIDAQABoAAwDQYJKoZIhvcNAQEFBQADgYEA0JDu
YpnOwYvjmzNxk0oCfHFJvUv9OU10P6NYT/PNHU5OituZ4AdIfAN4nwhlAU9ujjMS
6hoy/VR6qdpvHYI2ny4Smpq3QHjvup1TUayt8DQs7WSfcvP2hkUIh/AN2T9zUv7q
5wp4js00qOS9hn/N2RA4T6OJWihJZlxRKvL1AQE=
-----END CERTIFICATE REQUEST-----
Copy & paste the above information on SAP Site as shown below ↓ and Click continue to get the Certificate from SAP

Create a file srcert with the contect generated on SAPnet
starting from

-----BEGIN CERTIFICATE-----
MIIH5QYJKoZIhvcNAQcCoIIH1jCCB9ICAQExADALBgkqhkiG9w0BBwGggge6MIICd
zCCAeCgAwIBAgIDASMTMA0GCSqGSIb3DQEBBQUAMEYxCzAJBgNVBAYTAkRFMQwwCg
YDVQQKEwNTQVAxEjAQBgNVBAsTCVNBUHJvdXRlcjEVMBMGA1UEAxMMU0FQcm91dGV
yIENBMB4XDTA2MDgwNTEyNDEyOFoXDTA3MDgwNTEyNDEyOFowWTELMAkGA1UEBhMC
REUxDDAKBgNVBAoTA1NBUDESMBAGA1UECxMJU0FQcm91dGVyMRMwEQYDVQQLEwowM
DAwODEyOTc2MRMwEQYDVQQDEwpwYXJhc2Jhc2lzMIGfMA0GCSqGSIb3DQEBAQUAA4
GNADCBiQKBgQD8XhF+mevUxP6y/CA0AGYIOcT0tfXRfRVHs+iIoi4CI4k0CpR2u5A
1m6BLFFfFQjezLqYHHWU5IdjBb2SzQv5s2ND9FAQtIEtuPnJUeGJNG8TfCUSbizWV
pHkTobtyAWaEQkkhZ7IiBwKYuhyzIUvreN32uUruzKPkOBcRwkX2qQIDAQABo2AwX
jAMBgNVHRMBAf8EAjAAMA4GA1UdDwEB/wQEAwIE8DAdBgNVHQ4EFgQUGqyeaBLqAQ
jK6w7GO6eCbcI18kowHwYDVR0jBBgwFoAUdU3LKI0FDMFmL8NPq/BDMde/NjowDQY
JKoZIhvcNAQEFBQADgYEAEqEBBEjnN9kficcAu7JJZodp5Gt7YalBtmc1Dvz03Ffw
o1+w82F9U3Vc8orIQcOkJAlED4uAvqlWMY4lgfa8Dy41BvhJhnLwUnwFcJgr+garD
dVqNv2gSeHx7GJCenimAYRjdla1SdqCxBHJCnBNUM7fKldJ1npL/vjIWhlLcZcwgg
KXMIICAKADAgECAgERMA0GCSqGSIb3DQEBBQUAME8xCzAJBgNVBAYTAkRFMQwwCgY
DVQQKEwNTQVAxHDAaBgNVBAsTE1NlcnZpY2UgTWFya2V0cGxhY2UxFDASBgNVBAMT
C1NNUCBSb290IENBMB4XDTAwMDcxODEwMDAwMFoXDTEwMDcxODEwMDAwMFowRjELM
AkGA1UEBhMCREUxDDAKBgNVBAoTA1NBUDESMBAGA1UECxMJU0FQcm91dGVyMRUwEwYDVQQDEwxTQVByb3V0ZXIgQ0EwgZ8wDQYJKoZIhvcNAQEBBQADgY0AMIGJAoGBAP4
3aUxE11UGMWQmN1vP3tH5/qUXU+bWbOnEdbrWtNkFFSHz9oztzeK4vEeFlnf4Xa8d
gxaW1eczfn1qBzZAkLF60y8nsL4RYWy7UGMzFHFaX24J9X8iISZJw/8tHzji6PAko
1i0ntu+YxPQurJmsnCxOyq8gWizPxCIOLNLgfCDAgMBAAGjgYswgYgwDwYDVR0TAQ
H/BAUwAwEB/zAlBgNVHRIEHjAchhpodHRwOi8vc2VydmljZS5zYXAuY29tL1RDUzA
OBgNVHQ8BAf8EBAMCAfYwHQYDVR0OBBYEFHVNyyiNBQzBZi/DT6vwQzHXvzY6MB8G
A1UdIwQYMBaAFKK9OmNSzRn8vuhD0K7lhKBJ99r8MA0GCSqGSIb3DQEBBQUAA4GBA
L4zoEsyQIKTW0wJYCEwW92XTToDcAkt8MliAD4hg8DFGAKBmJXY4RtguBhtO3lk1R
5t1R1P6S0KjzE77tjUl+sQ0yc7a60gAaVIcREAxJr9FDEhiRto8xvtes0LZXbjwye
zNLiWyEzbHEcrmpgG3glpGQrebZxBZSylHvsbvuEqMIICoDCCAgmgAwIBAgIBEDAN
BgkqhkiG9w0BAQUFADBPMQswCQYDVQQGEwJERTEMMAoGA1UECGHTU0FQMRwwGgYDV
QQLExNTZXJ2aWNlIE1hcmtldHBsYWNlMRQwEgYDVQQDEwtTTVAgUm9vdCBDQTAeFw
0wMDA3MTgxMDAwMDBaFw0zODAxMDExMjAwMDBaME8xCzAJBgNVBAYTAkRFMQwwCgY
DVQQKEwNTQVAxHDAaBgNVBAsTE1NlcnZpY2UgTWFya2V0cGxhY2UxFDASBgNVBAMT
C1NNUCBSb290IENBMIGfMA0GCSqGSIb3DQEBAQUAA4GNADCBiQKBgQD+mun5PROSL
OljvOJMk42NPHzItiLAs3wtDWJKdwlW9GHTOHLComWcAf1fiDiArcfguJlKcQ3g50
9O4uqJwSi6rNyY+aKTgAXt6ThwATpGvhomo00ODAR6YH+6W+c0QHaqexuoMdG8xjS
B8S8dVOI8272SRfcVCESVAcuOGnStvwIDAQABo4GLMIGIMA8GA1UdEwEB/wQFMAMB
Af8wJQYDVR0RBB4wHIYaaHR0cDovL3NlcnZpY2Uuc2FwLmNvbS9UQ1MwDgYDVR0PA
QH/BAQDAgH2MB0GA1UdDgQWBBSivTpjUs0Z/L7oQ9Cu5YSgSffa/DAfBgNVHSMEGD
AWgBSivTpjUs0Z/L7oQ9Cu5YSgSffa/DANBgkqhkiG9w0BAQUFAAOBgQAPtE29ul9
GLYPlHhe1wi5EeIaOBthGUD14hV2hZgEwut93jozDL8IDPy4+XVxDNnnomBkdhU4E
AbX+3Bpde2AtBjp2PDLNx4eklgnSi45prDYNWGvZO2XkBNm7tPDAAsOyw9KZqdbGH
0l7LbzByc77aRGZx/EZGAr5shmwCk2zbjEA
-----END CERTIFICATE-----
execute the following command
sapgenpse import_own_cert -c srcert -p local.pse
enter the PIN
this is what is given to generate the certificate
Now execute:
sapgenpse seclogin -p local.pse
enter the PIN
this is what is given to generate the certificate
the file "cred_v2" is created
and access to this file should be available only to the user under whom the saprouter service is running
Set the environment variable
SNC_LIB=<drive>:\<path_to_libsecude>\<name_of_sapcrypto_library?
eg:
SNC_LIB=C:\SAPROUTER\sapcrypto.dll
Logoff and logon to activate the environment variable
Execute the following command from command prompt with current directory as saprouter
saprouter -r -K "p: CN=server7, OU=00001115752, OU=SAProuter, O=SAP, C=DE"
This is to check the Router Service
Install SAProuter as a service with the below command
ntscmgr install SAPRouter -b c:\saprouter\saprouter.exe -p "service -r -G log.txt -K ^p: CN=server7, OU=00001115752, OU=SAProuter, O=SAP, C=DE^"
Run "regedt32

Goto

HKEY_LOCAL_MACHINE on LocalMachine >> System >> CurrentControlSet >> Services >> SAProuter
Double click on "value" "imagePath" and replace ^ with " in the string

Double click on "value" "imagePath" and replace ^ with " in the string
Double click on "value" "imagePath" and replace ^ with " in the string


copy sapcrypto.dll as sncgss32.dll, so now these two files exists
Go to Services and edit the saprouter service.
Set the "Log on" setting to the user to whom the above environment variables are set, and with which the certificates are installed

Now change the Startup type to AUTOMATIC
And start the Router

Reboot the system and check the service for SAPROUTER startup.
************** End *************
THANKS FOR READ
by sachit sharma


कोई टिप्पणी नहीं:
एक टिप्पणी भेजें